Setup Environment Variables
MAPS_API_KEY
- Enable the Google Maps APIs:
- In the Cloud Console, navigate to “API & Services > Dashboard”.
- Click “ENABLE APIS AND SERVICES”.
- Search for “Maps” and enable APIs you need, like "Geocoding API".
- Get the API Key:
- In the Cloud Console, go to “Google Maps Platform”.
- Click on “Keys & credentials”.
- Your Maps API key will appear there.
- Replace
MAPS_API_KEYwith your key.
Google Login
- Enable Google+ API:
- Navigate to the "APIs & Services" dashboard.
- Click on “ENABLE APIS AND SERVICES”.
- Search for and enable the "Google+ API".
- Create Credentials:
- Go to the “Credentials” page within your project.
- Click on “Create credentials”.
- Select “OAuth client ID”.
- Configure OAuth Consent Screen:
- You may be prompted to configure the OAuth consent screen first.
- Fill in the required fields like application name, support email, and authorized domains.
- Save and continue.
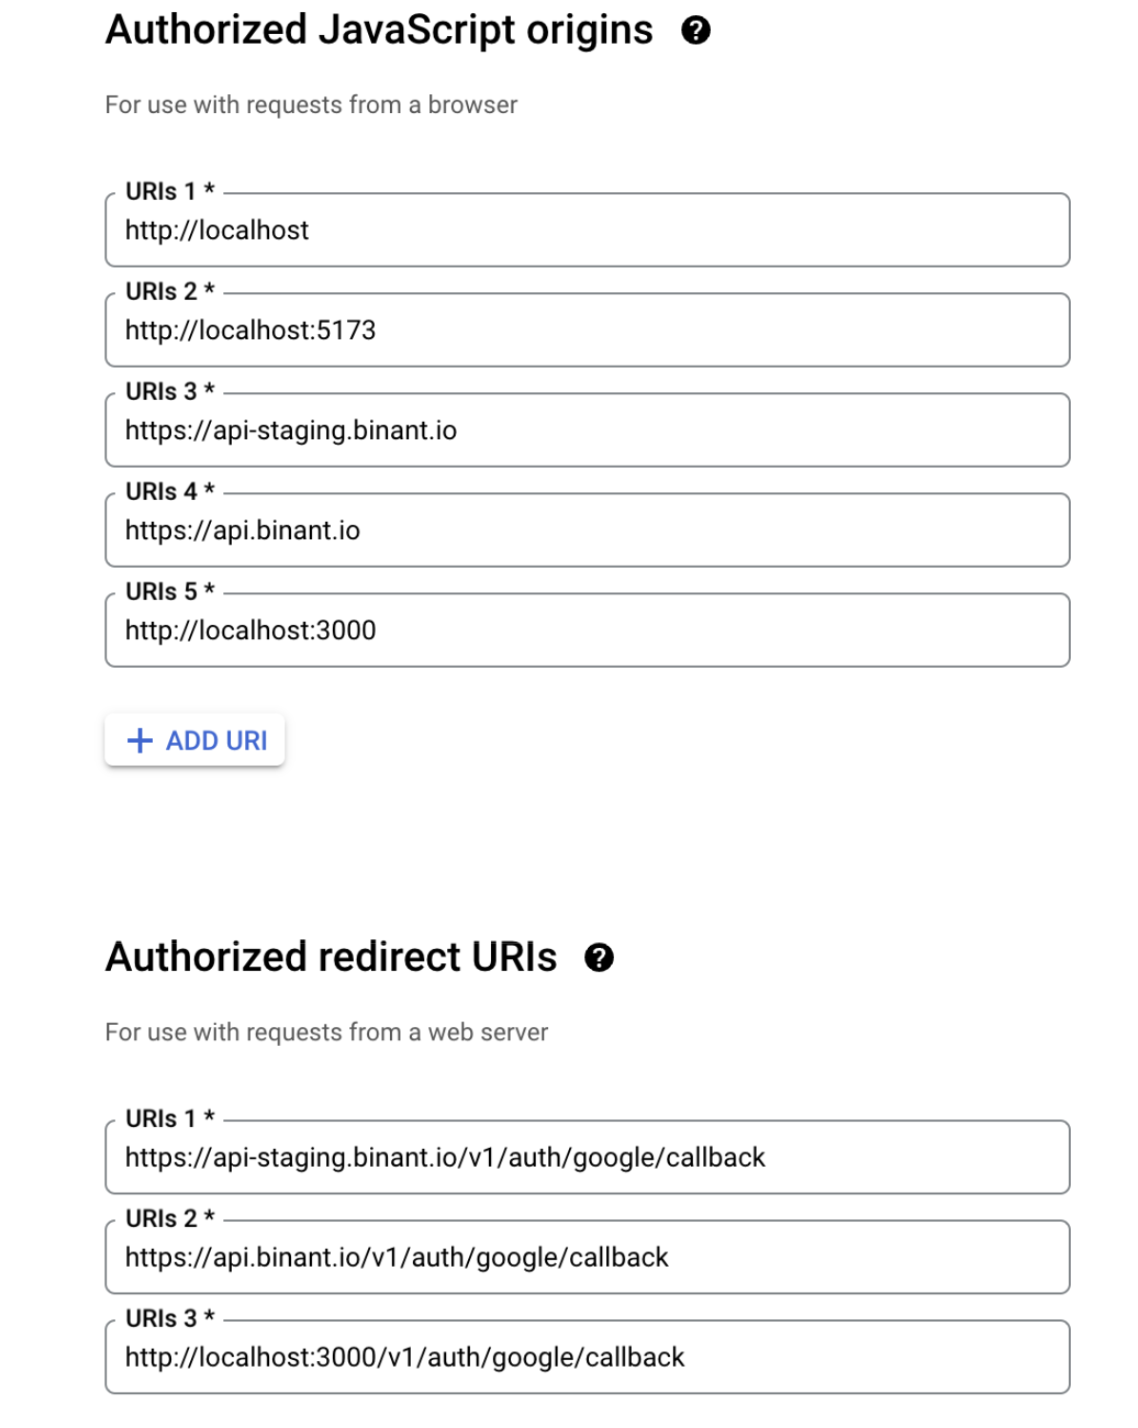
- Set Application Type:
- Select the application type for your project = Web application.
- Add authorized JavaScript origins and redirect URIs.
- Get Your Client ID and Secret:
- Once the OAuth client is created, you will see your Client ID and Client Secret.
- Copy these credentials; they will be used in your Passport strategy configuration.
Set envs
GOOGLE_APP_ID= Client IDGOOGLE_APP_SECRET= Client SecretGOOGLE_CALLBACK_URI= http://your-domain.com/v1/auth/google/callback (ex: http://localhost:3000/v1/auth/google/callback)GOOGLE_SUCCESS_REDIRECT_URI= Your success URL, it will have “access_token” as query param.
IP API Key
Needed for IP geolocation
IP_API_URL= https://pro.ip-api.comIP_API_KEY=<your IP API key>
Twilio
For phone verification
TWILIO_ACCOUNT_SIDTWILIO_AUTH_TOKENTWILIO_VERIFY_SERVICE
Twilio Setup
- Sign Up for Twilio: Go to the Twilio website and create an account.
- Verify Email and Phone: Complete the verification of your email and phone number in the Twilio console.
- Upgrade Account (if needed): Add billing information to upgrade from the trial.
- Get Twilio Credentials: In the Twilio Console, find your
TWILIO_ACCOUNT_SIDandTWILIO_AUTH_TOKEN. - Request WhatsApp API Access: Go to "Programmable SMS" > "WhatsApp" in the Twilio Console and request access.
- Create Messaging Service: Once approved, create a new Messaging Service for WhatsApp.
- Create Verify Service: In the “Verify” section, create a new service. Note the
TWILIO_VERIFY_SERVICESID provided.
Firebase Service Account & IAP Setup
Needed for FCM & Google Play IAP
- Create a Firebase account at https://console.firebase.google.com.
- Go to your Firebase Console, select your project, and navigate to Project Settings.
- Under the “Service accounts” tab, click “Generate new private key.” This will download a JSON file containing your service account credentials. Keep this file secure.
- Create a
.devfolder in the root project (make sure this folder is added in.gitignore). - Inside
.dev, copy your service account file as this filenamefirebase-service-account.json. - Log in to the Google Cloud Console with the same email of the Firebase account.
- Select Project: From the top-right dropdown menu, select the Google Cloud project (the same as Firebase).
- IAM & Admin: In the left sidebar, navigate to IAM & Admin > IAM.

- Click on edit principal.
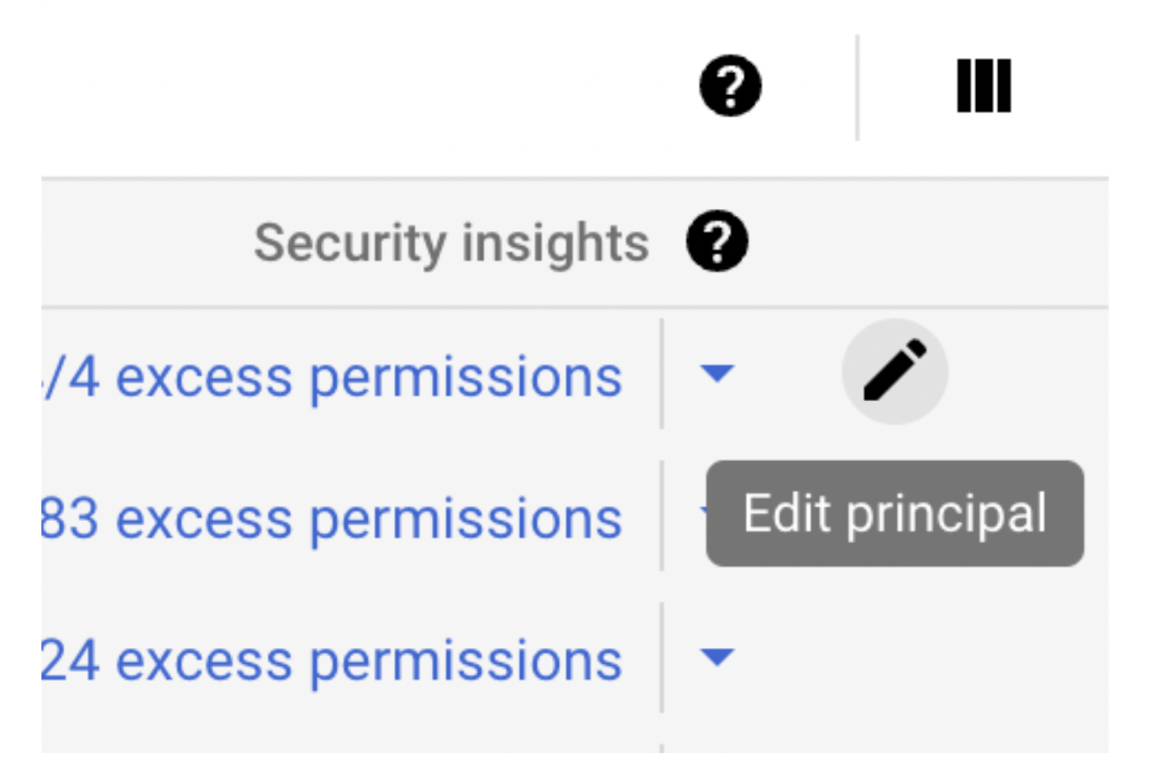
- Give it these permissions: Editor, Pub/Sub Admin, Android Management User.
Enable Google Play Android Developer API
- In Google Cloud Console, search for “Google Play Android Developer API”.
- Enable the API.
Link Google Play Account
- In GCP console, IAM & Admin > IAM.
- Copy the principal’s email: e.g., “[email protected]”
- Go to https://play.google.com/console/
- Navigate to Users and Permissions.
- Click on Invite User.
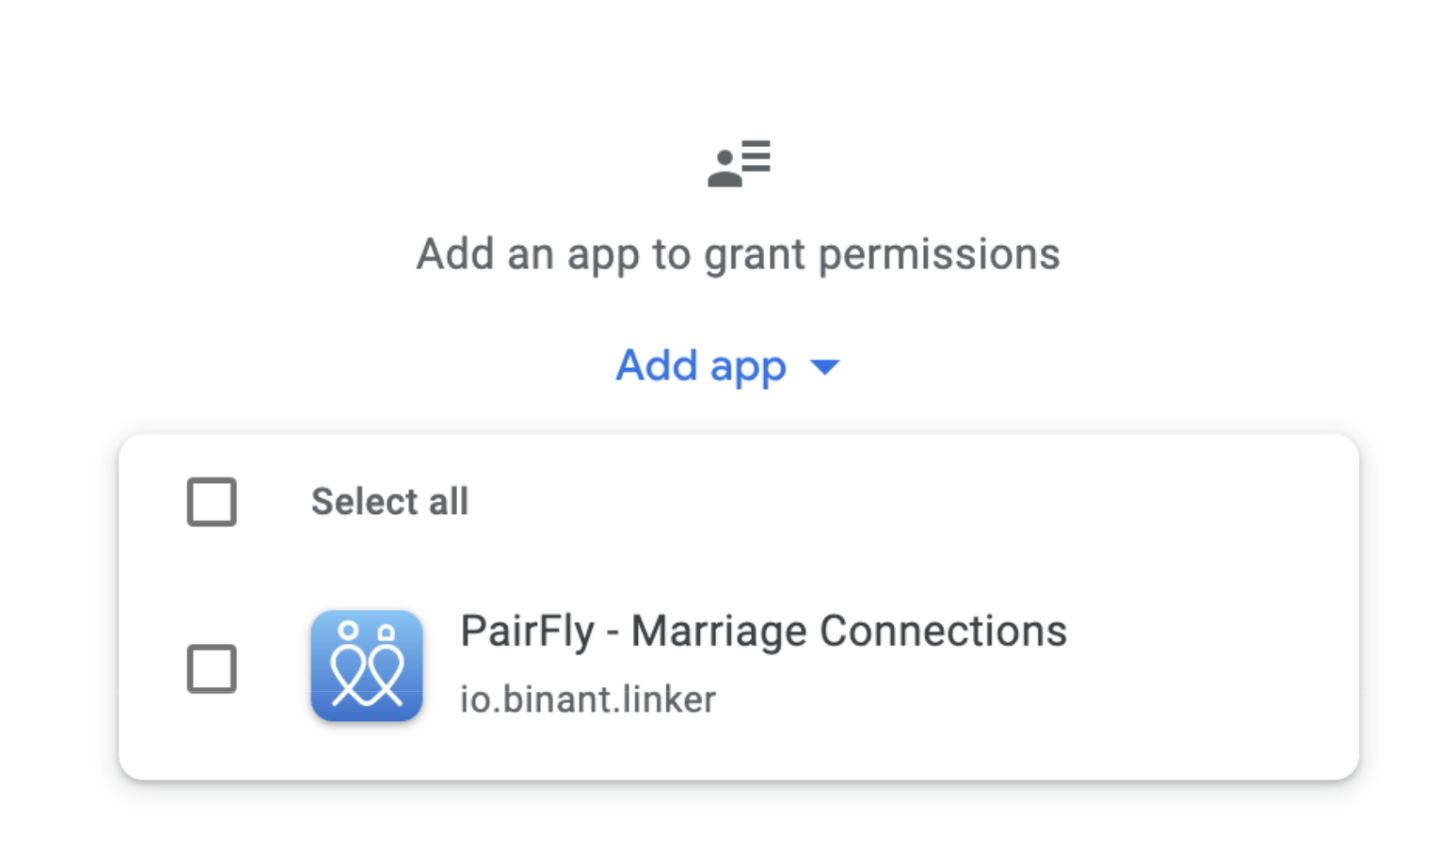
- Paste the principal’s email.
- Add an app to grant permissions -> select your app -> Give admin access.
- Save; Wait for at least 24 hours for changes to take effect.
Facebook App Credentials
-
Create a Facebook Developer Account:
- Go to the Facebook Developers website.
- Log in with your Facebook account.
- If you don't have a developer account, you'll be prompted to create one.
-
Create a New App:
- Navigate to 'My Apps'.
- Click on 'Create App'.
- Choose 'Consumer' for the type of app.
- Fill in the details (App Name, Contact Email, etc.) and click ‘Create App ID’.
-
Configure Facebook Login:
- Inside your App Dashboard, select 'Facebook Login'.
-
Get
FACEBOOK_APP_IDandFACEBOOK_APP_SECRET:- These can be found in the 'Settings' > 'Basic' section of your app dashboard.
-
Set Up
FACEBOOK_CALLBACK_URI:- This is the URL where Facebook will redirect users after authentication.
- Example:
https://YOUR_API_URL/v1/auth/facebook/callback - Set this up in 'Facebook Login' settings.
- Make sure this URL is in 'Valid OAuth Redirect URIs' under 'Facebook Login' > 'Settings'.
-
Set Up
FACEBOOK_SUCCESS_REDIRECT_URIFACEBOOK_SUCCESS_REDIRECT_URI: After login success, it will redirect to this URL, and it will have “access_token” as a query param.
IOS APNs Auth Key
for notifications in IOS
- Head to your Apple developer account.
- Go to the keys section and click on the plus button.
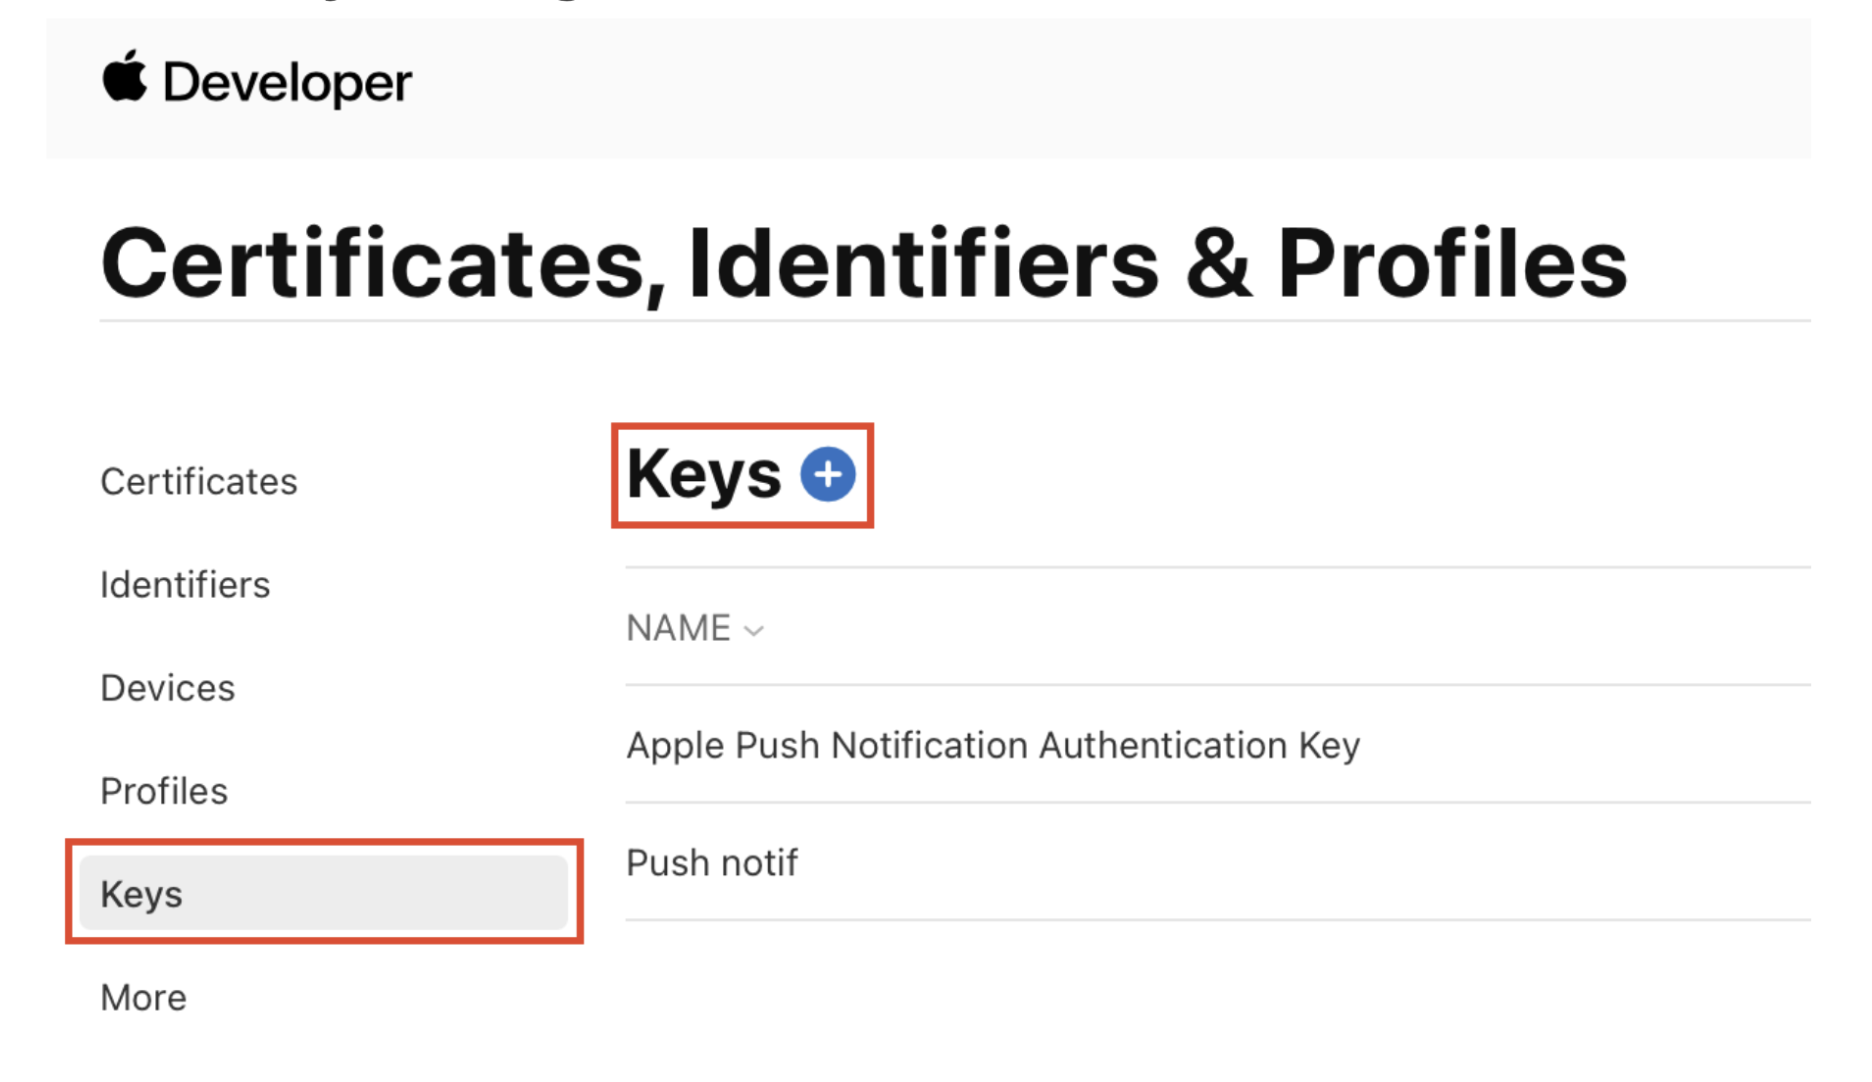
- Select the Apple push notification service.
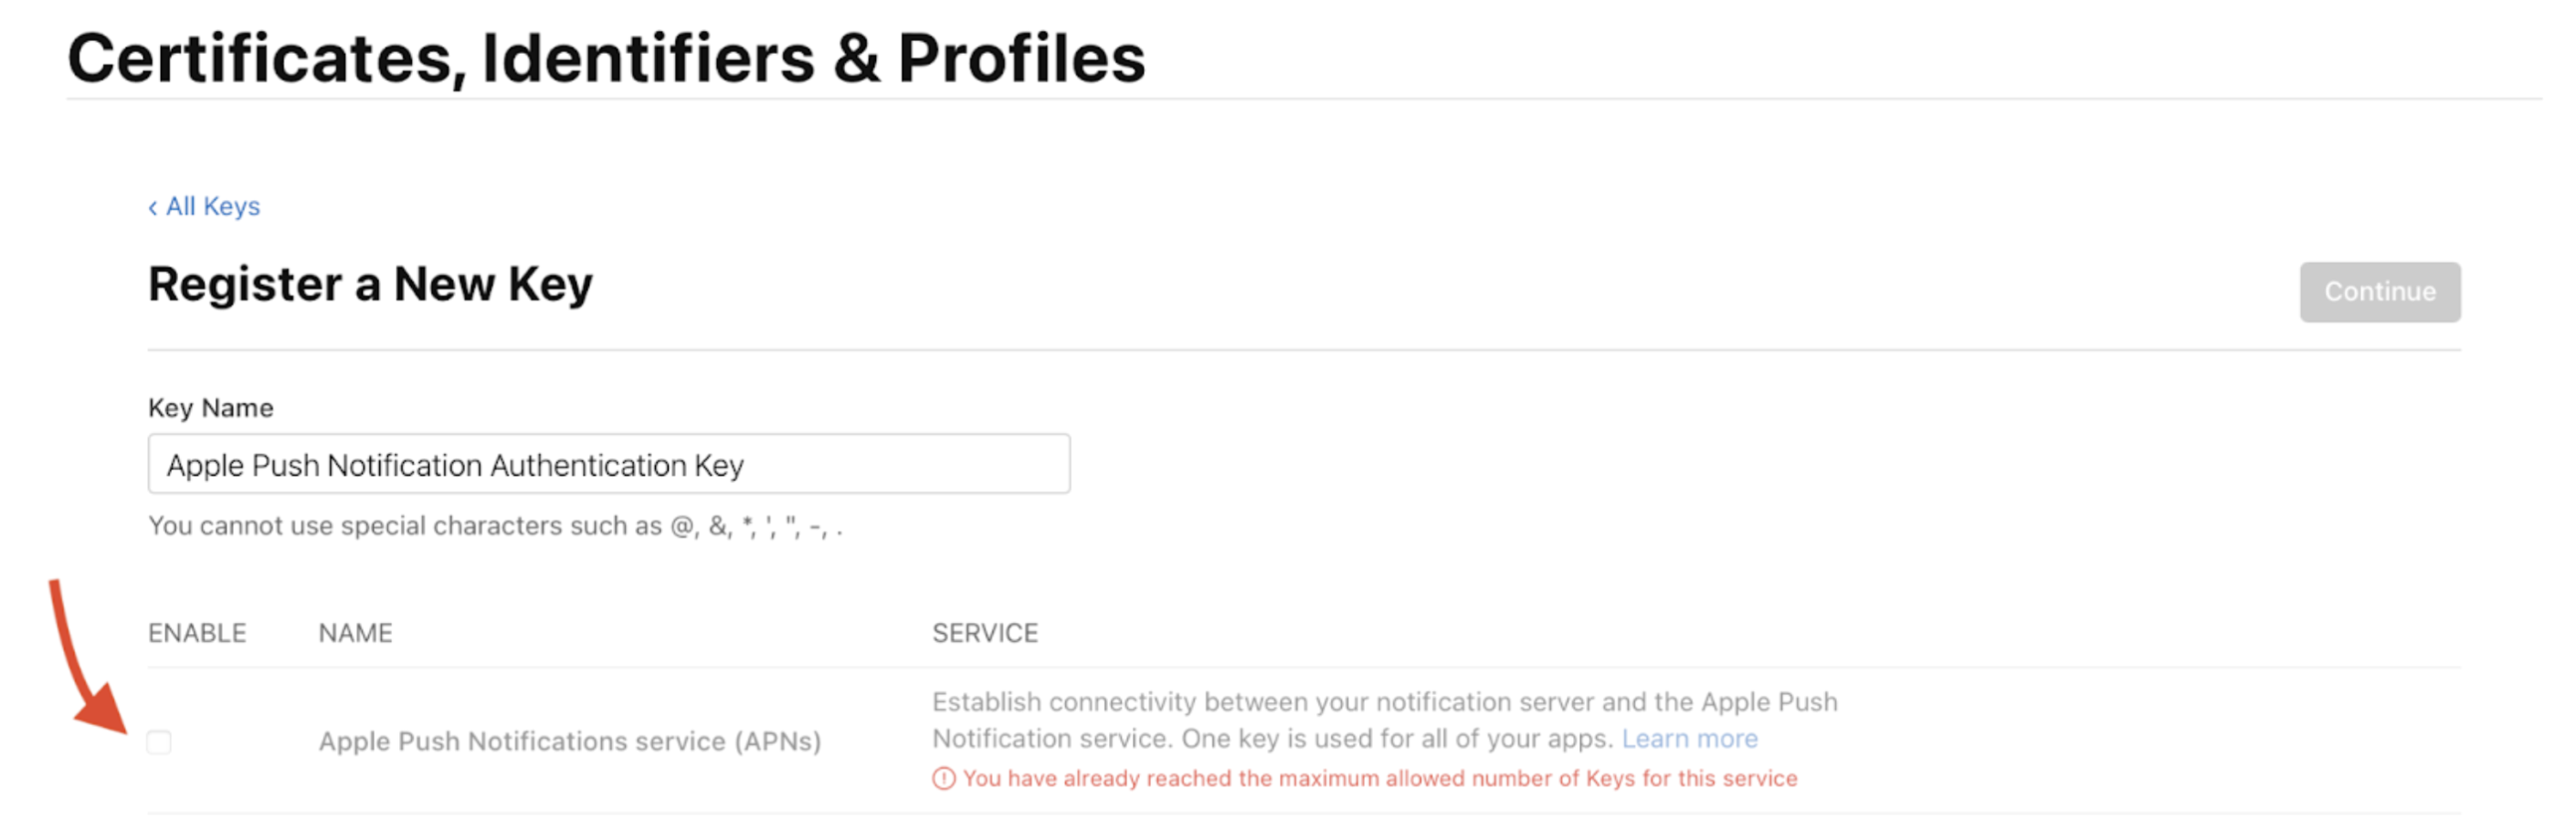
- Download the
.p8file and secure it somewhere. - Go to Firebase -> select your project -> settings -> cloud messaging -> under your iOS app -> APNs Authentication Key -> upload the
.p8file.
IOS IAP Subscriptions Private Key
- Create and download the private key: https://developer.apple.com/documentation/appstoreconnectapi/creating_api_keys_for_app_store_connect_api
- Keep the file in a secure folder.
- Copy it to
.devasiap-apple-private-key.p8. - In Apple Store Connect go to Users and Access -> Integrations -> In-App Purchases -> click (+) to generate a new purchase key.
- Type a name and click generate.
- Copy key ID to the env var
APPLE_IAP_KEY_ID, and issuer Id toAPPLE_IAP_ISSUER_ID.